

Sunday, October 30, 2011
Feel Your Boobies!!!!
If you haven't already seen the beautiful array of Pink EVERYTHING this month....then let me fill you in... it's Breast Cancer Awareness Month! It is super important to start early doing exams and seeing your doctor to make sure you stay healthy. Early detection is the KEY to fighting and beating breast cancer.
Natalie from Johnny In A Dress has some great links and information for you to check out. Head on over there! She even has a great giveaway for getting the word out about being "Pink for a Day"! Most of us know someone who has fought a battle with breast cancer, so let's remember those women and do what we can to keep ourselves healthy too!
Friday, October 28, 2011
Gray's New Jacket
I wasn't loving a lot of the baby jackets on the market....the cute ones weren't warm enough, and the warm ones were too puffy....and the really cute ones were too expensive for her to outgrow in a few months. After going on my Fabric Shopping Extravaganza, I came home with the perfect materials for a jacket for Gray.


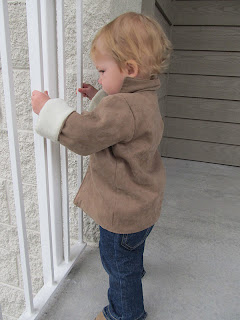

I think it turned out very Baby Gap-like

It's made of buttery soft suede and lined with fleece, so it's super soft AND warm, but it's not really bulky.
All of the raw edges are hidden, so in theory it's reversible...but I wouldn't want the suede on the inside. Maybe I'll do another one day with two fleece colors and make it reversible...but that's for another day.

Ya'll know I'm incapable of following a pattern, so this is another "Jenilyn Original". I measured Gray, added a little room and seam allowances and used shapes of other things I've made her to create the shape I wanted. Hubby wanted her to have a collar instead of a hood, so this was my first attempt at a collar, but it was easy peasy.
I'm still scared of sewing buttonholes (which is why I've never done it) even though I have a buttonhole attachement thingy on my machine, so I think it's set-and-go....one day I'll try it out. The elastic loops are fun anyways.

It kept her toasty warm in the Mountains last week.

I love that it matches her little boots.

She's got room to grow in it, but I've got LOTS of the suede leftover, so if I don't make pillows, or a jacket for me...I can just make her another in a bigger size!

I am over the top thrilled with how it turned out and I'm glad she likes to wear it. I think she needs a few more in other colors to match everything!
Thursday, October 27, 2011
Our Little Vacation
Hubby and I have tried to go to the mountains for a little mini-vacation every year that we've been together. Last year we didn't make it because Gray was so small, but we were determined not to miss it this year! I managed to get a few nights off work at the last minute so we booked a small condo and headed up the mountain. Gray had never been to the mountains so this was new for her too. We stayed in Pigeon Forge, Tennessee and enjoyed days there and in Gatlinburg, walking, shopping, and eating some amazing food.
The drive up was beautiful and 80 degrees! We had to change clothes when we got there.


The drive up was beautiful and 80 degrees! We had to change clothes when we got there.

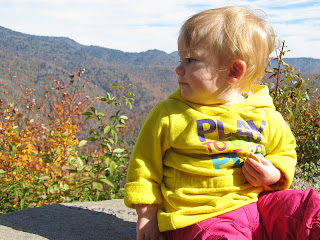
We went at the peak of color change so everything was so colorful.


Gray wanted to be Queen of the World on her little rock.

The colors of fall are so gorgeous.

(Objects in mirror are more awesome than they appear)

It was a little rainy, but we didn't let that get us down!

We had a great mountain view from our condo balcony. It was very peaceful.


We went to The Apple Barn for lunch. We had never been but had heard good things about it...and everything was amazing!
Look at these little apple fritters with apple butter. Yummmmmm!

We met some fellow Clemson fans while there, and they agreed to take a picture for us. It's hard to get family pictures!

I thought this picture was cute...until I noticed the creepy guy around the corner!! Yikes!

Gray was all worn out by the time we started shopping.

So that evening we relaxed in the pool! She loves swimming with her Daddy.

Gatlinburg was FREEZING so we bundled baby girl up...and she decided it was nap time.

But she woke up in time to play with a pumpkin


I'm pretty sure this sign was lying....


On our way home....it SNOWED!!! It was 80 degrees on the way up, and 35 on the way home...just two days later!

I found this little "survivor" tree

Hubby was so excited to see snow on his birthday. It doesn't snow here in October! It's still hot outside.

We hated to come back to the real world, but it was nice while it lasted.
Tuesday, October 25, 2011
Wild Thing Costume Tutorial
Here is the original post from my tutorial over at Hideous, Dreadful, Stinky. If you missed the Halloween Costume tutorials over there, make sure you spend some time and check them out!
I would like to give a BIG thank you to Marigold for inviting me to share my "Wild Thing" halloween costume with everyone today! Over at my BLOG, I share all of my favorite crafts and sewing projects for babies, mommies and home decorating. I would love for you to stop by and spend some time with me! Make sure you check out the Tutorials page for tons of fun projects.
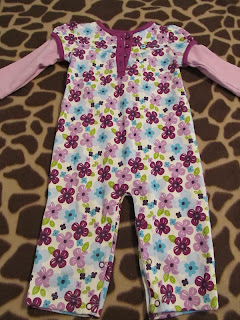
My baby girl just turned 1 a couple of months ago, so for Halloween, we wanted her to be something that she LOVES...her Giraffe! I love things that have multiple uses, so when making her costume, I wanted to keep it simple so she could wear it as a sleeper too! There's nothing like a fleece onesie to keep you warm in the chilly wintertime.
This costume is made of Giraffe print fleece, but ANY animal print could be used with this pattern to make all sorts of "Wild Things"!


I would like to give a BIG thank you to Marigold for inviting me to share my "Wild Thing" halloween costume with everyone today! Over at my BLOG, I share all of my favorite crafts and sewing projects for babies, mommies and home decorating. I would love for you to stop by and spend some time with me! Make sure you check out the Tutorials page for tons of fun projects.
My baby girl just turned 1 a couple of months ago, so for Halloween, we wanted her to be something that she LOVES...her Giraffe! I love things that have multiple uses, so when making her costume, I wanted to keep it simple so she could wear it as a sleeper too! There's nothing like a fleece onesie to keep you warm in the chilly wintertime.
This costume is made of Giraffe print fleece, but ANY animal print could be used with this pattern to make all sorts of "Wild Things"!

Let's Get Started!
Materials:
(For a size 12 month. Use more fabric for a bigger size.)
1/2 yard animal print fleece
1 coordinating 12" zipper
1/8 yard, or large scrap of coordinating fleece (for tail)
All of the wonderful things needed to sew

Start with the body of your suit. I used an existing onesie that fit my daughter to get the length and width of the suit right. You could also measure your child, but this method is less squirmy!
If your fleece has a little stretch in one direction, make sure it stretches to the width. This will be important when trying to attach your zipper!

Cut out the body and leg portions of your pattern, making sure you add 1/2" for seam allowances. You can trace an existing outfit, or eyeball it. It doesn't have to be exact. In fact, make it a little loose for comfort.
Cut two. A front and back.

Use your favorite sleeve pattern, or trim one off of an old shirt to get the shape and cut two long sleeves.

If you are adding a hood, you will need two 1/4 circle pieces. Tracing a bowl and cutting it into quarters works best for me! Make sure it's big enough to go around your baby's head. The radius of my bowl is about 10 inches. (The straight lines in the picture below are 10")

Cut out two pieces for the hood.

To make some neck room, fold ONE body piece in half, and cut on the fold.

It should look like this when unfolded.

Time to sew!
Start by sewing your arm pieces together down the long side. If your fleece has a right and wrong side, sew right sides together.

Sew your hood into one piece, by laying out your pieces, curved sides together, and sewing the curved edges together.

With right sides facing, pin and sew the shoulders of your suit together. Then sew down each side and between the legs. Make sure you leave the neck, armholes, and bottom of the legs open.

Pin your sleeves onto your armholes and stitch them on. This can get a little tricky, but just take your time.

It's starting to look like a Giraffe suit!

It's zipper time! Lay your zipper on the front side of your suit to measure how long you want it to be.

Cut a slit on the front side only down the middle, ending where you want your zipper to stop.

Sew in your zipper. Make sure you stitch it well at the bottom to keep it secure.

If you've never sewn in a zipper, check out THIS tutorial.

Line the bottom of the hood up with the neck of your suit and stitch together. Try to hide the ends of your zipper in the seam if you can! If your hood is a little wider than your neck, you can always trim off a little.

To finish the arm and leg holes, do a standard turn and turn hem, or you can zig-zag the raw edges. I chose to zig zag mine because it looks funky and fun.

To make the tail, cut 5" long strips of coordinating fleece. They can be wide or skinny. I cut 8 that are 1/2" wide.
Stack the strips on top of each other forming a star pattern.

Wrap a piece of thread around the center and pull to gather the strips. Tie off the thread to hold it in place.

Hand stitch a piece of ribbon to the puff, and sew the other end of the ribbon to the back of your suit.

Stand back and admire your fluffy and warm Giraffe suit!

Complete with a fluffy tail.

Your baby will blend in with all of their jungle friends!


I think she's taking the giraffe role a little too far with gathering the acorns!

Happy Sewing!!
*There are so many different things you can do to add to this costume, this is just a basic way of getting the suit together to get you started! Add ears or horns, line the hood, add hooves with gloves or shoes...the possibilites are endless and totally up to your imagination*
Thanks again for having me today Marigold! I hope everyone has a wonderfully SpOoKy Halloween!
Subscribe to:
Posts (Atom)