Tuesday, August 30, 2011

Who's Ready For Football???

My favorite season is finally here....Football Season!! If only given 4 options, I will always choose fall, but my real favorite season runs from September to January. And pro football doesn't count...College Football is where it's at. If you are a new reader, you may not know that I am a die-hard Clemson Tigers Fan! I don't hide my love, I wear my purple and orange proudly.

Here are a few goodies I found on Pinterest to help me get into the college football spirit:

Is there anything more gorgeous than Death Valley on a sunny Saturday???


Howard's Rock...ready to run down the Hill. (Clearly this is a really old picture)


This makes me giggle... Sorry USC fans


Must. Have. This.


A few of my favorites already at my house...

The Clemson Carolina Breeze Bag!
(Get your own in the Etsy Shop)


The Baby Football...ready for Tiny Tigers
See the tutorial HERE


Cornhole! Can't wait to play these tailgating....


My Game Day dress ready for kick off on Saturday

Grayson's outfit is ready to go too! She loves wearing her purple and orange
(Tutorial for the baby shorts coming soon....stay tuned!)


Who are you pulling for this college football season???

If it's a college game, I'll watch it. But if my Tigers are playing, you know where to find me.

Sunday, August 28, 2011

Denim Sprinkles Skirt Tutorial

If you missed it last week, here is the tutorial for the Denim Sprinkles Skirt, originally posted at Craftionary.


Let's get started!

Materials:
1/4-1/2 yard Lightweight denim
4 or more colors of thread (I used pink, purple, green, blue, yellow)
1/2" elastic
All of the wonderful things needed to sew

Begin by cutting your fabric. Use a skirt that fits your little girl well, or measure around her waist. Add 8" to the waist measurement. This will give the skirt some gathering and fullness.

Measure the length that you want the skirt to be. I wanted mine knee length because I have a crawler and she hates long dresses. Add 2 1/2" to your length for seam allowances and your elastic casing.


Once you have your measurements, cut out your rectangle of denim. Fold it in half, right sides together and sew the side seam.


Now we will make the casing. Fold the top of your skirt over, making sure you have enough room for your elastic.


Fold the edge under 1/4" and pin all the way around the skirt. This will hide your raw edge and give you a nice casing. Sew all the way around, but leave a 2" opening that you don't sew so that you can thread your elastic through.


Once your casing is sewn, run a safety pin through the end of your elastic. This will make sure you don't lose the elastic in the casing.


Start threading the elastic through the opening. Make sure it doesn't get twisted.


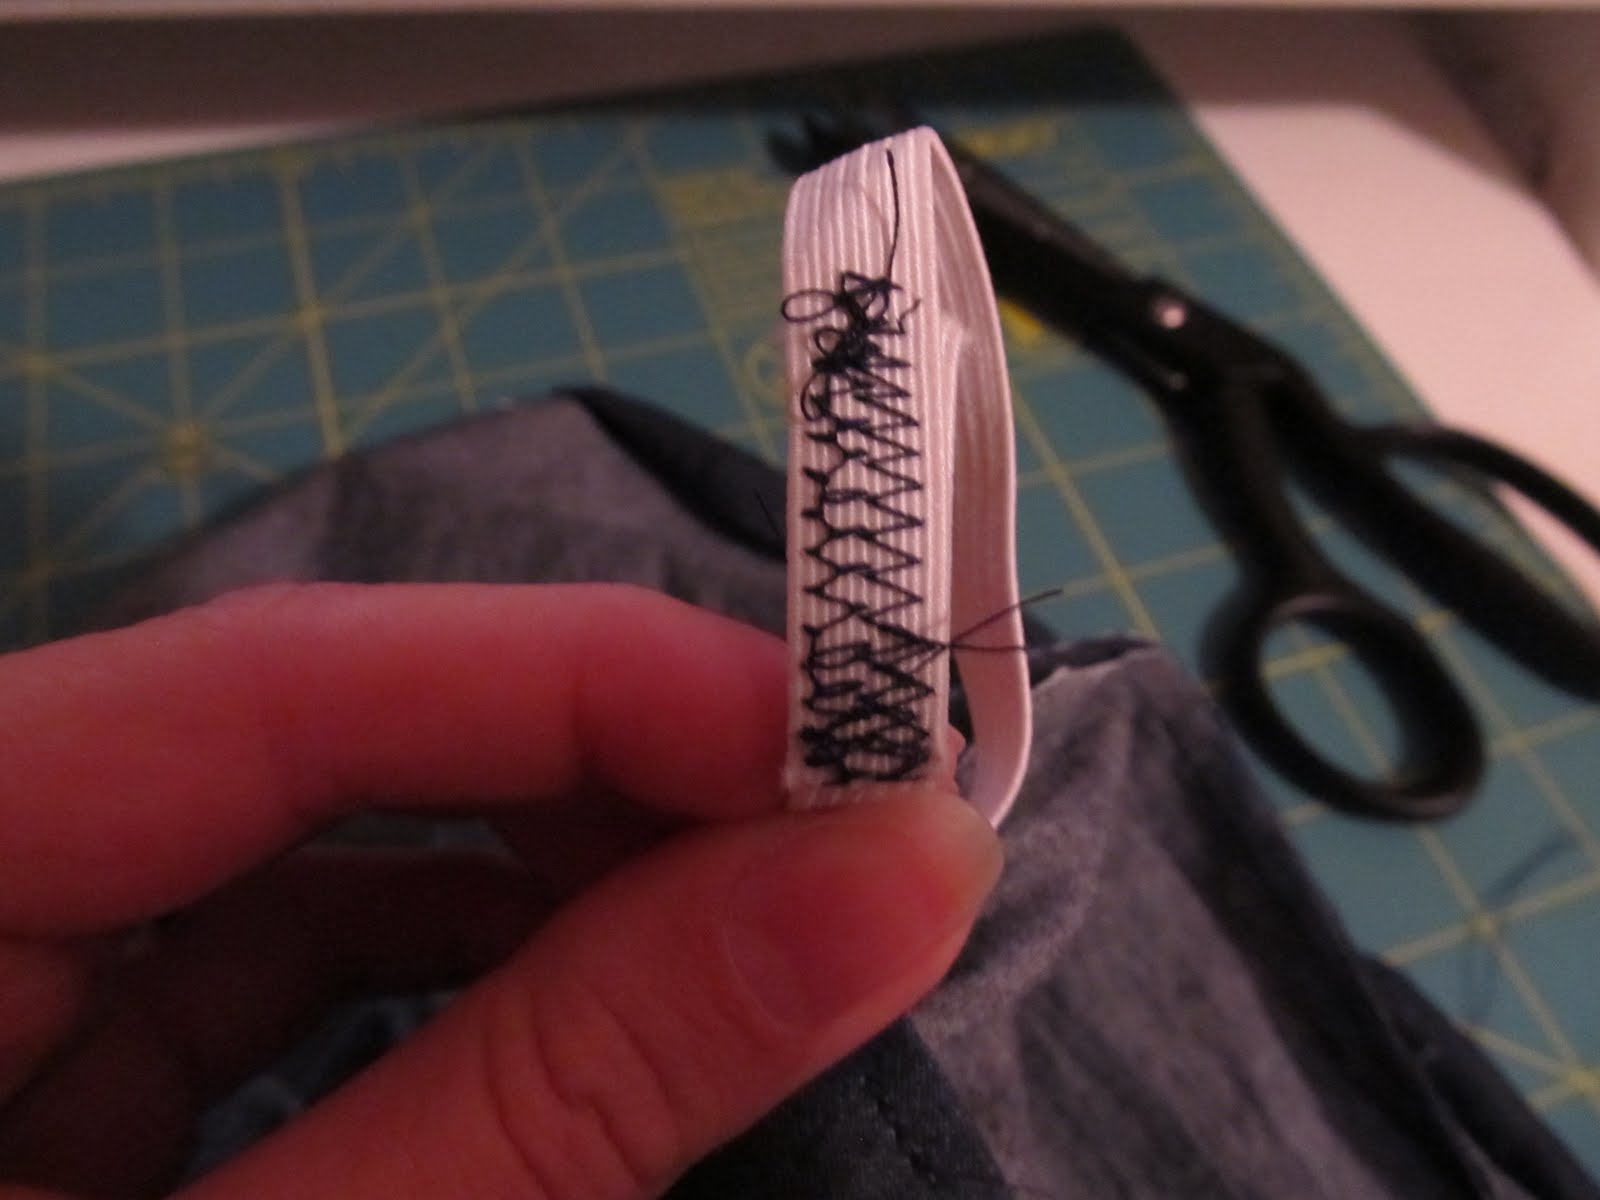
Once it's all the way around, overlap the ends of the elastic and sew them together securely.


Using several zig-zag stitches will hold it in place. Tuck the elastic into the casing, and finish sewing the casing shut.


Now for the hem. Fold the denim under 1/4" then another 1/4" and pin.


Choose the order of thread you want to use for your rainbow "SPRINKLES"
(I ended up not using the red.)


You can leave your bobbin thread the same color, just change out your main thread on top of your machine. Begin sewing all the way around your skirt, one color at a time. At least one of these colors will catch and hold the hem in place. You can remove the pins after it does.


Continue sewing rows until you're happy with your rainbow.


Now your skirt will coordinate with lots of outfits and add a pop of color to anything!
Want further embellishment?? You could always add pockets, buttons, or an Applique .


Throw the skirt on your baby girl and enjoy!!


Perfect for crawling and exploring the outside world, and cool enough for the hot summer sun!


This would also be super cute in a lightweight linen, or bright cotton (minus the "sprinkles"...the skirt is simple to make and cute by itself!


Friday, August 26, 2011

Giveaway!!

A few weeks ago, Toni from Crazy4Fluff contacted me about doing a review for our Teething Pearls. After falling in love with the name of her blog (I am, after all, a lover of all things cloth diapering) I sent her a set in my beloved Tutti Fruity pattern!


She wrote a wonderful review and even included pictures of her oldest daughter wearing them wanting to "be like mommy". How cute is that???

The giveaway is for a $15 gift certificate to Grits & Giggles Etsy Shop. Don't have a teething baby??? There are great other items for women and girls!

Carolina Breeze Bags


Reversible Headbands

More Teething Pearls


Rosette Earrings

The giveaway ends in two weeks, so hurry on over there and enter! I would LOVE for one of my readers to win!!

Click Here for the Giveaway

Good luck!!

Wednesday, August 24, 2011

My First Quilt

Well I've gone and done it...I've made a quilt! This is something I said I would never do because it looked WAY too difficult and I just didn't have the time. While it was very time consuming, and by no means easy, it was a lot of fun and I love the finished product!


I wanted the top to be a classic pinwheel design. I used a pack of fat quarters and some fabric from my stash. I loved the pinks, greens, and blues. It's girly but not too over the top.

I think Gray likes it too!! It's not bed-sized, but it's big enough to lay under and stay super warm. I used organic cotton batting which is really thick and warm. It doesn't get really cold here, but we like to snuggle under blankets.


I'm not ready to tackle free-motion quilting, so I straight-line quilted this top by machine. Sorry to those "quilting purists" who hand quilt everything. Kudos to you!! I really don't know how you do it.


I like the backing as much as the front. I LOVE the super-loud print. It has all of the colors from the front and is fun and playful.


Since the binding was pink, I added some blue and green to the backing as well.


I'm a very impatient person, so I machine stitched my binding. It's going to take some practice to get it smoother and more even, but I like the result.


I look forward to making some more quilts, and trying new techniques. This one was pretty big for my first, so next time I'll make a doll quilt!!

Tuesday, August 23, 2011

Guest Posting


Come join me today over at Craftionary where I'm sharing a tutorial for Gray's Denim Sprinkles Skirt!! It's a super easy skirt for any size little girl, from an infant to a school-aged sweetheart.

Click HERE for the tutorial!


Sunday, August 21, 2011

Distressed Art

I have found a new love....Distressed Art! I love old-looking artwork and unique pieces, so when I found out how to make some for myself I just had to get to it. Delia at Delia Creates has a great tutorial on how to make distressed wall art. Using blank canvases and gel medium, you can turn any photocopied image into beautiful artwork. The trick is to use super cheap paper and and a copier with toner. The cheap paper and copier at the hospital was absolutely perfect!!  It may seem complicated, but it's super easy and the results are totally worth the time!

My first project of course had to be a picture of my favorite little person.

This was one of her 6 month pictures, taken by the fabulous Angie Dean . This is probably my all time favorite picture of her. It looked old fashioned to begin with, but this distressing was the icing on the cake!

This is the original photo I have framed, and the distressed canvas next to it. Not too shabby.


When Hubby and I were in Myrtle Beach a few months ago, I saw a plate in an SC store that had the most amazing saying on it. Ya'll know that I have a serious love for all things South Carolina...


I wanted to see if the transfer using gel medium would work if I painted the canvas first. It worked!! I wanted swirls and polka dots for my kitchen, and I put the saying right on top. It will be a welcome addition to the wall.

I love how both of them turned out. I have ideas of other project swirling in my head using the distressed concept, and I can't wait to work on them! I'm thinking some great Christmas decorations....


God is Good,
God is Great.
Thank you God
for the
Palmetto State!

This could of course be written for any state, or state of mind for that matter.


Friday, August 19, 2011

Giveaway!!


Featured On The Crafty Nest


Vanessa of The Crafty Nest has done a wonderful review of our Teething Pearls, and is now hosting a giveaway!! The winner will choose their favorite color of Teething Pearls from my shop. I would love for one of my readers to win!


Go HERE to see ALL of the different ways to enter the giveaway. If you are already a Grits and Giggles follower on GFC, Facebook, or Twitter...that's 3 entries already!! The giveaway will only be open for a couple of weeks, so make sure you head over and enter.

 
The Crafty Nest is one of my favorite blogs to read. Not only does she have absolutely amazing reviews and giveaways almost every day, she has DIY projects and tales of Mommyhood! Plan to hang out for a while when you hop over to her site!
 
Good luck!!


Wednesday, August 17, 2011

Birthday Craft Round Up


Here is a round up of all of the fun and festive crafts from Grayson's first birthday party!! Imagine all of the color combos and different ways you could create an amazing party/shower with some of these super easy ideas. To see the original birthday post with all of the crafts in action...click HERE

Click on the link under the pictures for each tutorial!!


I was a little late to the game on joining Pinterest, otherwise I would have used some of these amazing ideas for Gray's party! But...I can share some of them with you now, and stash the ideas away for next year.


How adorable is this balloon wreath?? Now I wish I'd been collecting all of those popped and deflated balloons. Talk about recycling!


These rainbow cake pops look amazing


I've seen so many cupcake decorations and "flags" in the last few weeks. The more I see...the more I love them


It was love at first sight with these ribbon topiaries. There WILL be a Christmas version of these in my house in a few months.


I hope you've enjoyed our craft round up and have gotten a little inspiration for your own parties and showers.

Happy Crafting!
Related Posts Plugin for WordPress, Blogger...