Showing posts with label Halloween. Show all posts

Thursday, October 23, 2014

Halloween Bag Tags

Do you hand out little bags of candy on Halloween?? Or do you let kids have a free-for-all in your candy bowl? If you're a bagger, then you'll love these FREE bag tags!


 Just bag up some candy in a clear baggie, and tie your tags to a string after punching a hole in the corners. You can even write "To" and "From" on the back if they're for a class party.


Click HERE to download your "BOO to you" tags for FREE!


Monday, October 6, 2014

EEK Halloween Printables

Looking for some fun and spooky decor for Halloween?

How about some EEK!!! Printables?

This FREE printable contains all 4 colors, perfect for classrooms, mantles, tablescapes, and other home decor. Just download, print, and place in your favorite 5x7 frame.

(The background of the actual PDF file is solid white. These images are for viewing only)


Click HERE for the 5x7 PDF file


Friday, November 1, 2013

Our Happy Halloween

It was all treats and no tricks for our family this year! Yippie!
 
I hope your Halloween was safe and happy as well.
 
A little Goldilocks told me she wanted to be one of "Aunt Kai Kai's Cheerleaders" for Halloween. Kaileigh is a cheerleading coach at our high school, so I obliged and made her a legit uniform to wear. I think she could join the sideline crew tomorrow!

 
The old-school pleated skirt makes me happy. And of course she loves that it twirls.

 
She needed a monogrammed ribbon to match.

 
Like a good supportive brother, baby boy was a football. He was a little small for pads and a jersey this year.

 
We had our annual Trunk-or-Treat at the church. It's a fun time, with a safe place for neighborhood kids to trick-or-treat without the door to door. I borrowed Mama's décor this year and set up a harvest theme. All Halloween doesn't have to be spooky.


Of course, some participants go all out! Goldilocks' Sunday school teacher made for a decent death-row inmate! Noose included.

 
Hubby helped her trick or treat around the parking lot. I was proud of her though...she had more fun handing out candy than asking for it!

 
My "niece" was a pumpkin pie. How stinking cute is she???
Her Daddy's a chef, so it was totally appropriate.

 
Her and baby boy are just a few weeks apart in age. Little twinsie cousins.

 
Now that Halloween is over with I can wait for my favorite holiday....Thanksgiving! I boycott all things Christmas until the day after Thanksgiving. First things first people...first things first.

Sunday, September 22, 2013

For the Love of Halloween

Pinterest is quickly reminding me that October, and Halloween, are just around the corner! Here is a little round up of some Halloween goodies from Grits & Giggles.


Still one of our most popular posts EVER...
 
The Funky Halloween Wreath


If you need a little costume inspiration, both of these are good starting points for TONS of costume ideas!
 
Make any princess or fairy you would like with a sweet little tulle dress.
 
 
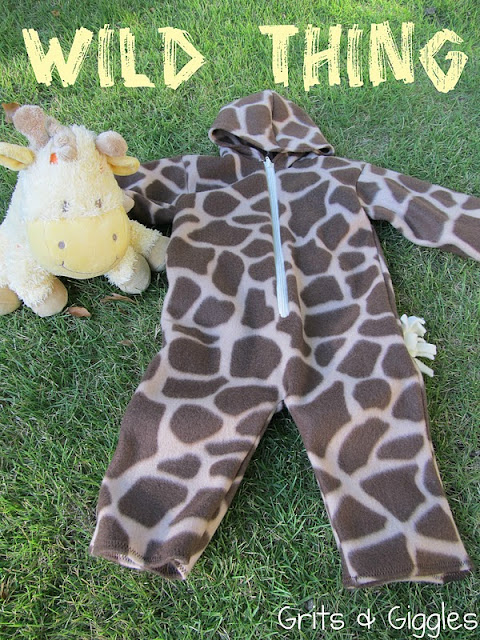
And this hooded fleece outfit could be made out of ANY animal print, or make a good base for another costume. The fleece will keep your little one nice and toasty while trick-or-treating.


I'm still debating what the costumes will be for this year. I have something in mind that the whole family will love....but we'll see!
 
Check out our Tutorials Page for ALL of the sewing and crafting goodness from Grits & Giggles.
 
Happy Crafting
 

Wednesday, October 24, 2012

{Tutorial} Tulle Dress

Today I'm bringing home another tutorial for the Halloween season! This guest post was over at FreeTime Frolics as part of their Halloween Masquerade series, celebrating the food, costumes, decor, and parties that we all love at Halloween.

I've had to hide this TuTu dress from Gray for the past few weeks, because she insists on wearing it all. the. time. It's a good problem to have, but I want it to be intact for Halloween! After next week, it's all hers.

----------------------------------------------------------------------

I'm Jenilyn, author of Grits & Giggles. I love to share my adventures in sewing, crafting, and being a mommy! I'm so excited to be at FreeTime Frolics today to share with you how to put together a TuTu Dress fit for a princess!

My daughter's favorite song is "You Are My Sunshine". She sings it all day and it never gets old to hear! She loves to dress up and twirl, so I knew for Halloween she needed a sparkly tulle dress. I wanted it to be golden and beautiful, just like the sunshine in her favorite song. 


Let's get started!

Materials:
1" Elastic
Tulle- 100 yards for a 2T size
Flower Clip
Coordinating Ribbon


Measure around your little girl's chest. This is your elastic length. Overlap by 1" and sew the ends together. You want it fitted, but not too tight. 


Measure her height from her chest to where you want the tutu to fall. Multiply this by 2 and add 3". This will be your tulle length.
ex: my measurement was 20"....so my tulle length was 20x2+3= 43"

Cut strips of tulle this length and the width of your spool. You will need a LOT, especially if you use a light color. 


I place the elastic band around my leg for support. Place 2-3 strips of your tulle, in different colors, together and fold in the middle. Slip this under your elastic band.


Then pull the ends of the tulle through, creating a knot. Don't pull it too tight yet, as the elastic will stretch when you do. Wait until you're finished to tighten. 


Continue tying these knots all the way around the elastic, alternating colors and combinations. Gently tighten your knots when you're done. 


To add a halter strap, cut a long length of your ribbon, and tie a similar knot, between two knots of tulle. 


Clip on your flower clip and you're done! Your tutu dress is ready to be worn and twirled in!


It flows beautifully, and sparkles in the October sun.


Thanks again for having me from Grits & Giggles!

Check out some of my other Halloween and Fall Tutorials!
 
-----------------------------------------------------------------
 
*Happy Crafting*

Tuesday, October 23, 2012

{Tutorial} Trick or Treat Baby Feet

I'm bringing home my guest post tutorial from See Vanessa Craft today to share with my Crafty Friends! This project was done for her "20 Crafty Days of Halloween" this month, celebrating all things Halloween!

---------------------------------------------------------------------------

I'm so excited to be back at See Vanessa Craft today to share with you a fun Halloween project! One of the cutest things on the planet HAS to be baby feet, and I wanted to make sure I captured mine while they were still little. What better way to do that then to make an art piece to use for years!
 
Today I'm going to share with you how to make "Trick or Treat" wall art using precious baby feet.

 
Let's get started!
 
Materials:
 
11"x14" Canvas
Acrylic paints
Paintbrush
Vinyl letters or stencil
White glue
Glitter


You will also need a set of tiny baby feet! If your child's feet are larger, you may need a larger canvas, or make your wording smaller so everything fits.

 
Place your acrylic paint in a bowl and take it outside. This can get messy!


Paint your baby feet however you like. I liked the black and orange stripes. My little one tells me that paintbrushes on your feet "tickles", so expect some sqirming!
 

Press the feet firmly onto the bottom of the canvas.

 
Use your paintbrush to carefully touch up any bare spots on your footprints. They don't have to be perfect, just fill in where it really needs it.
 

If you have a cutting machine, you can make a vinyl sticker or stencil of your wording. If you have a steady hand...just freehand it!
 
The font for my wording is "Mirage Gothic". You can download it for free HERE. It's perfect for Halloween!
 

Apply your wording to your canvas above your feet. Make sure the feet are dry first so there's no smudges.
 

To add some fun, use your white glue and draw some spider webs in the corners of your canvas.
 

Sprinkle them with glitter, and shake the excess glitter off.


Once it's dry, use a brush to remove any excess glitter that stuck to the canvas.
 
You're done!!

Add it to your mantle or buffet to enjoy this Halloween season. Make sure you write the year or your baby's age on the back to remember when they had those tiny footprints!
 

Thanks again to Vanessa for having me over!
 
Stop by anytime and visit Grits & Giggles for more fun projects for any holiday!
 
See Vanessa Craft

 
*Happy Halloween*
Related Posts Plugin for WordPress, Blogger...